 402
402
Enroll your iOS device with the Intune Company Portal app to gain secure access to your organization's email, files, and apps.
After your device is enrolled, it becomes managed. Your organization can assign policies and apps to the device through a mobile device management (MDM) provider, such as Intune.
To maintain access to work or school information from your device, you'll need to configure your device to match your organization's preferred settings. This article describes how to use Company Portal to enroll your device and maintain access requirements.
What to expect from the Company Portal app
Security
During initial setup, the app requires that you authenticate yourself with your organization. It then informs you of any device settings you must update. For example, organizations often set minimum or maximum character password requirements that you'll be required to meet.
Protection
After your device is enrolled, the Company Portal app will continue to make sure that your device is protected. If you install an app from an untrusted source, for example, the app will alert you and sometimes revoke access to company data. This kind of policy is common in organizations and often requires you to uninstall the untrusted app before you can regain access.
Setting notifications
If after enrollment your organization enforces a new security requirement, such as multi-factor authentication, the Company Portal app will notify you. You'll have the chance to adjust your settings so that you can continue to work from your device.
Prerequisites
- Device running iOS 14.0 and later.
- Install Company Portal app from App Store.
- Maintain a Wi-Fi connection until all steps are complete.
- Have access to Safari web browser on your device.
Enroll your iOS device
Pausing for more than a few minutes during enrollment might cause the Company Portal app to close or end setup. If this happens, reopen the app and try again.
-
Open the Company Portal app and sign in with your work or school account.
-
When prompted to receive Company Portal notifications, tap Allow. Company Portal uses notifications to alert you if, for example, your device settings need to be updated.
-
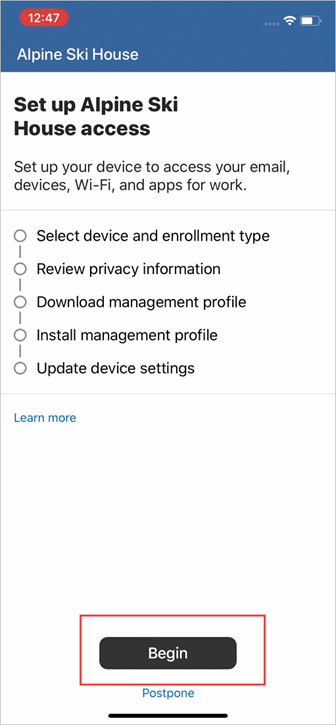
On the Set up access screen, select Begin.
-
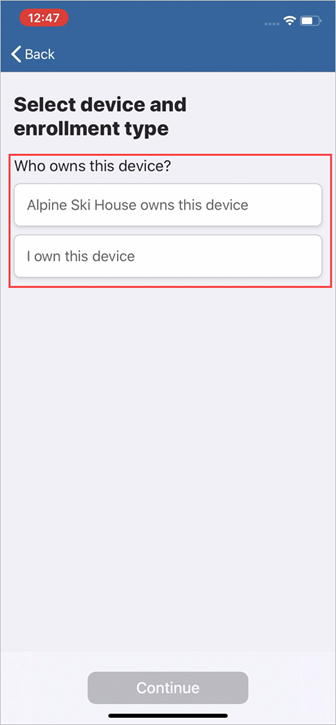
The Select device and enrollment type screen appears and prompts for your device type.
- Tap (Organization) owns this device if you received your device from your organization. Then skip to Secure entire device in this article to finish setup.
- Tap I own this device if you're using a personal device that you brought from home. Then continue to the next step.
If you don't see this screen, skip to Secure entire device to finish setup.
-
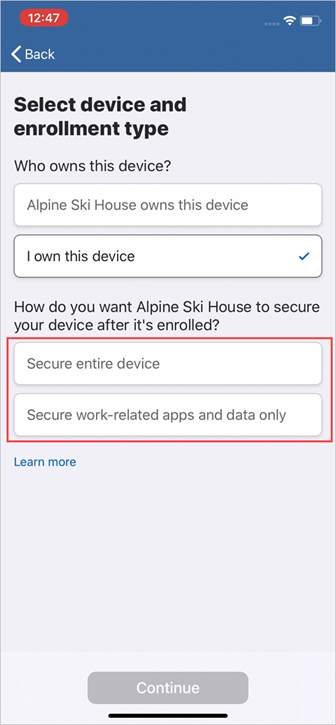
Choose how to protect the data on your device once it's enrolled.
- Tap Secure entire device to secure all apps and data on the device. Then go to Secure entire device to finish setup.
- Tap Secure work-related apps and data only to secure only the apps and data you access with your work account. Then go to Secure work-related apps and data.
Secure entire device
- On the Device management and privacy screen, read through the list of device information your organization can and can't see. Then tap Continue.
Important
These next steps and screens will differ depending on your iOS version. Follow the steps for your iOS version.
-
Safari opens the Company Portal website on your device. When prompted to download the configuration profile, tap Allow. If you're on a device running:
- iOS 12.2 and later: When the download is complete, tap Close. Then continue to step 3.
- iOS 12.1 and earlier: When the download is complete, you are automatically redirected to the Settings app. Skip to step 4.
If you accidentally tap Ignore, refresh the page. You'll be prompted to open the Company Portal app. Once you're there, tap Download again.
-
Note
You must install the management profile as described in the next steps within 8 minutes of downloading it. If you don't, the profile will be removed and you'll have to restart enrollment.
-
When prompted to open Company Portal, tap Open. Read through the information on the How to install Management Profile screen.
-
Go to the Settings app and tap Enroll in < organization name > or Profile Downloaded.
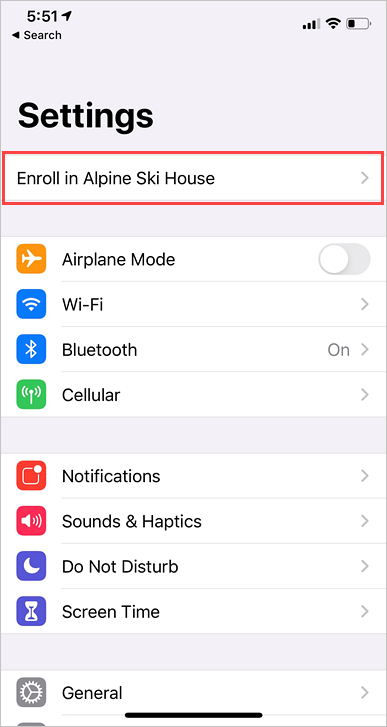
If neither options appear, go to General and select the VPN & device management option to view installed profiles. If you still don't see the profile, try downloading it again.
-
Tap Install.
-
Enter your device password. Then tap Install.
-
The next screen is a standard system warning about device management. To continue with the installation, tap Install. If you're prompted to trust remote management, tap Trust.
-
After installation is complete, tap Done. To verify that the profile was installed, go to your VPN and device management settings. You should see the profile listed under Mobile Device Management.
-
Return to the Company Portal app. Company Portal will begin to sync and set up your device. Company Portal might prompt you to update additional device settings. If it does, tap Continue.
-
You'll know that setup is complete when all items in the list show a green checkmark. Tap Done.
-
Note
If your organization monitors voice and data limits or provides you with a company-owned device, you might have a few more steps to complete. If you're prompted to install the Datalert app, see enrolling your device in telecom expense management. If your organization is part of Apple's Device Enrollment Program, find out how to enroll your company-owned device.
Secure work-related apps and data
-
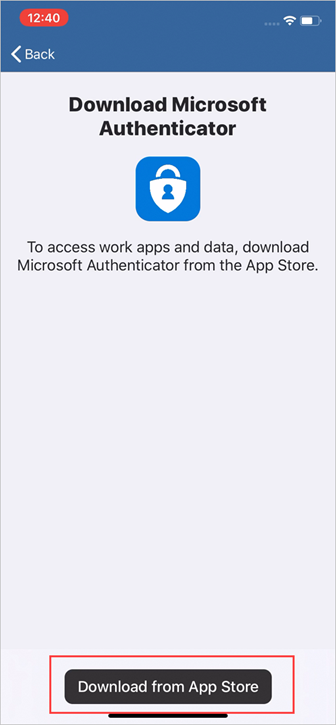
The Download Microsoft Authenticator screen appears (if you already have Authenticator, you won't see this screen so skip to step 2).
- Tap Download from App Store.
- When the App Store opens, install the app.
- Return to Company Portal and tap Continue.
After you install Microsoft Authenticator, you won't need to do anything else with the app. It just needs to be present on your device.
-
On the Device management and privacy screen, read through the list of device information your organization can and can't see. Then tap Continue.
-
Important
These next steps and screens will differ depending on your iOS version. Follow the steps for your iOS version.
-
Safari opens the Company Portal website on your device. When prompted to download the configuration profile, tap Allow. If you're on a device running:
- iOS 12.2 and later: When the download is complete, tap Close. Then continue to step 4.
- iOS 12.1 and earlier: When the download is complete, you are automatically redirected to the Settings app. Skip to step 5.
If you accidentally tap Ignore, refresh the page. You'll be prompted to open the Company Portal app. From the app, you can tap Download again.
-
Note
You must install the management profile as described in the next steps within 8 minutes of downloading it. If you don't, the profile will be removed and you'll have to restart enrollment.
-
When prompted to open Company Portal, tap Open. Read through the information on the How to install Management Profile screen.
-
Go to the Settings app and tap Enroll in < organization name > or Profile Downloaded.

If neither options appear, go to General and select the VPN & device management option to view installed profiles. If you still don't see the profile, try downloading it again.
-
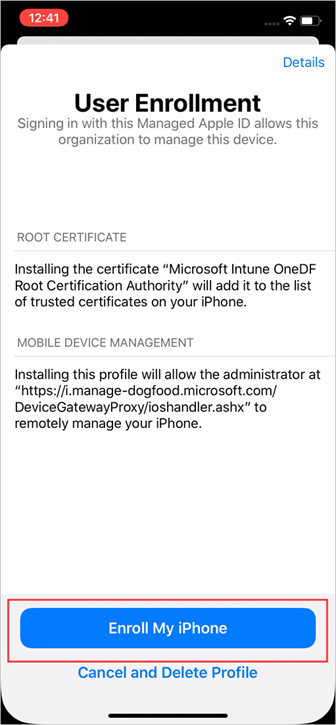
On the User Enrollment screen, tap Enroll My iPhone.
-
Enter the device password. Then tap Install.
-
On the Sign in screen, enter the password for your managed Apple ID. In most cases, these credentials will be the same ones you use to sign in to your work or school account, unless your organization provided you with a different set of credentials.
-
Tap Sign in.
-
A success message will appear on the screen briefly after the profile is installed. To verify that the profile was installed, go to your VPN and device management settings. You should see the profile listed under Mobile Device Management.
-
Return to the Company Portal app. Company Portal will begin to sync and set up your device. Company Portal might prompt you to update additional device settings. If it does, tap Continue.
-
You'll know that setup is complete when all items in the list show a green checkmark. Tap Done.


